Load your components
Parts, selected stainless steel pins and the recommended liquid compound are placed in a processing container.
SMALL PARTS. HIGH STANDARDS.
Bring a better finish to your precision parts. Magnetic pin deburring reaches intricate features, removes light burrs and helps reduce time spent finishing by hand.
01 / THE PROCESS
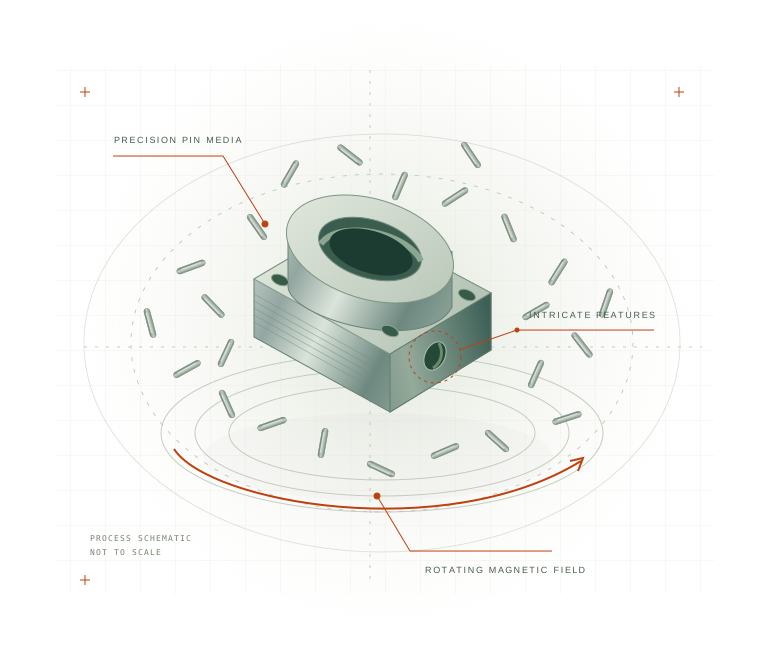
Magnetic deburring uses moving pin media to work around your components — including accessible features that are difficult to finish by hand.
Parts, selected stainless steel pins and the recommended liquid compound are placed in a processing container.
A rotating magnetic field drives the pins through the batch. Their contact with the parts removes light burrs and refines surfaces.
Separate the media, rinse and dry the components, then check the finish against your drawing and acceptance criteria.
The right process starts with your part. Material, burr size, feature access and media selection all affect the result. A representative trial establishes a suitable process.
02 / APPLICATIONS
Start with the features you need to finish. Explore common application types, then talk to us about your material and drawing requirements.
EXPLORE BY COMPONENT
Aluminium · Brass · Copper
Stainless steel and other alloys: assess by grade.
PRECISION MACHINING
Explore light burr removal on small turned and milled components. Verify critical edges, dimensions and surface finish during the trial.
Discuss this application03 / YOUR SETUP
Machine selection starts with your batch, component geometry and required finish. We can discuss the equipment and consumables your application needs.
THE EQUIPMENT
Choose a processing area and loading arrangement suited to the size and quantity of your components.
Find your setup ↗THE FINISHING MEDIA
Match pin size and process chemistry to the material, burr and smallest accessible feature.
Discuss consumables ↗THE STARTING POINT
Bring a representative sample and a clear definition of a good part. Build your decision around the result.
Discuss a sample trial ↗A BETTER-INFORMED DECISION
The best finishing method depends on the job. Start with a conversation about what you need to remove — and what you need to preserve.
Talk through your application ↗A useful starting pointSmall precision components with light burrs and features accessible to the selected media.
Worth a closer lookBlind holes, fine threads, magnetic alloys and fragile features require specific assessment.
Consider another processHeavy burrs, large edge radii or inaccessible passages may call for a different finishing method.
It is a batch finishing process in which a moving magnetic field drives small steel pins against component surfaces. It is used to remove light burrs and improve the finish of suitable parts.
Potentially, where the selected pins can enter, move through and leave the feature. Blind holes and intersecting passages need trial inspection for burr removal and retained media.
Aluminium, brass and copper are common candidates. Stainless steels and other alloys need assessment by exact grade and magnetic behaviour. Share the material specification when you enquire.
Any contacting finishing process can affect an edge or surface. Agree critical dimensions, edge limits and roughness requirements before the trial, then measure the results.
There is no single cycle time for every component. Burr size, material, pin selection and batch loading all matter. Include loading, separation, rinsing, drying and inspection when comparing total processing time.
Start with the material grade, approximate dimensions, batch quantity, burr location and required finish. We can then discuss suitable samples and arrange how to share drawings.
05 / LET’S TALK PARTS
Tell us what you make, where the burrs are and what a finished part needs to achieve. Let’s explore the right approach.
START WITH YOUR APPLICATION
Include these details in your email: